

Index
- Usecase
- How to changing your Password
- How to Upload Files
- How to share files with an individual
- How to share files with a group
- How to set a password and expiration date for a shared folder
- How to Share with Read-Only Permission (Download X, Edit X)
- Overview of the User Interface
- Main menu interface
- Files menu interface
- Search
- Personal Setting
- File Structure and Access Permission System
- How to Upload Files
- How to Share Files
- Sharing with Internal Users (Users with the same affiliation or account)
- Sharing with External Users
- Enhanced File and Document Security
- Password Configuration
- Set Access Expiration Date
- Custom Permission Settings(custom access control)
- File and Document Upload Requests
Usecase
How to changing your Password
The password change feature is not available within the DMS.
Since our accounts are securely managed through Azure B2C, they operate independently from the DMS's internal account system. (The same applies to the LMS and Q&A platforms.)
- If you are currently logged in, please log out first.
- Then, navigate to the login page and use the "Forgot your password?" feature to reset your password.
- please check the screenshot below to locate the "Forgot your password?" option.

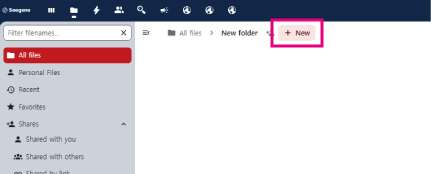
How to Upload Files
- Navigate to the desired upload location (folder).
- Click the [+New] button next to the file navigation.
*If the button is not visible or is disabled, it means you do not have the necessary permissions for that folder. If uploading is essential, please contact the system administrator for assistance. - Click the [Upload files] or [Upload folders] button to complete the upload.
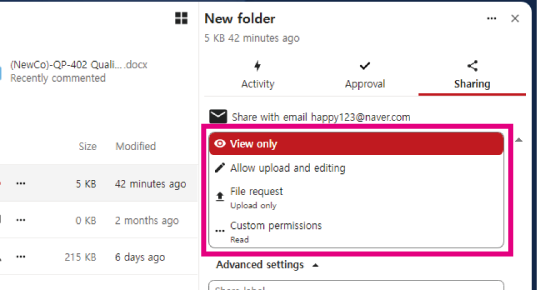
How to share files with an individual
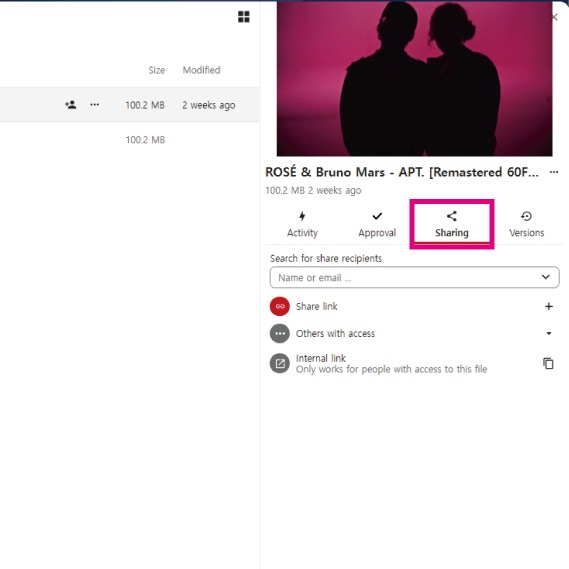
- Click the sharing icon to the right of the folder you want to share to open the Sharing menu tab.
- Enter the email address of the recipient in the Search for share recipients field to share.
*The sharing method may vary depending on whether the recipient is an internal or external user. For more details, please refer to the manual below before sharing.
How to share files with a group
- Click the sharing icon to the right of the folder you want to share to open the Sharing menu tab.
- Enter the group name you want to share with in the Search for share recipients field, then select the displayed group name to share.
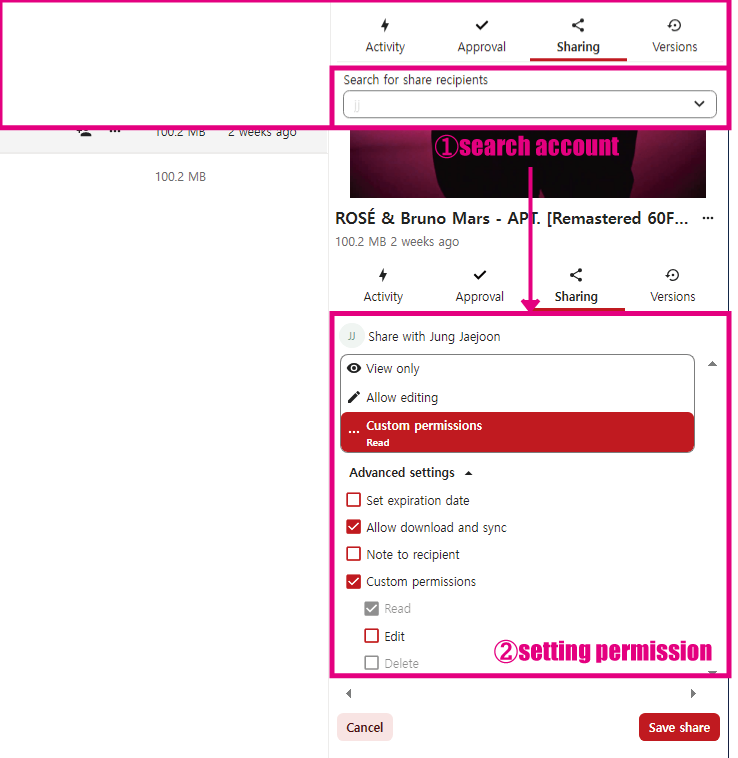
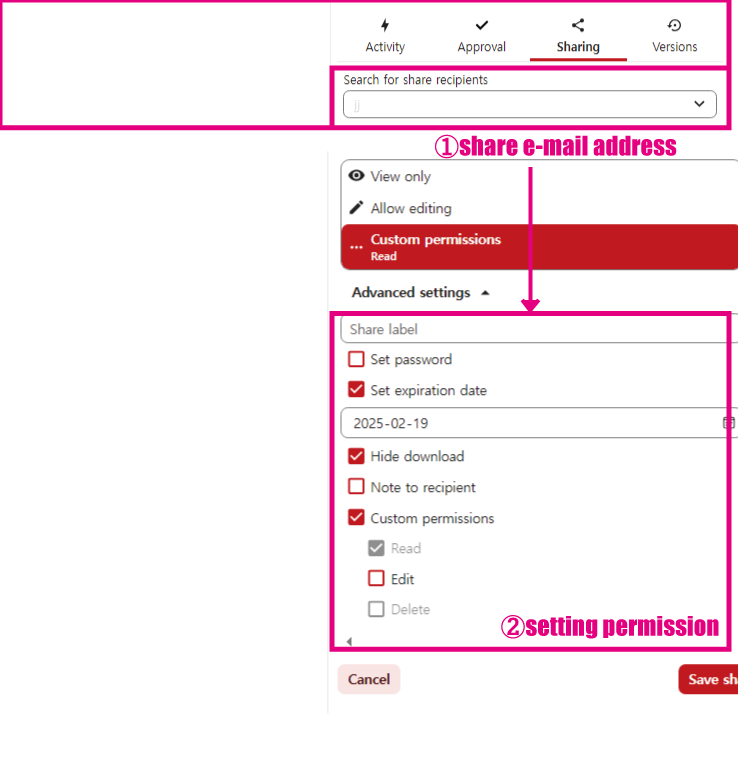
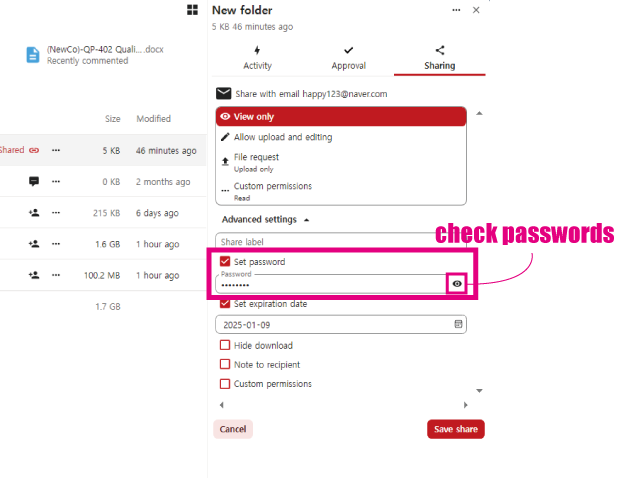
How to set a password and expiration date for a shared folder
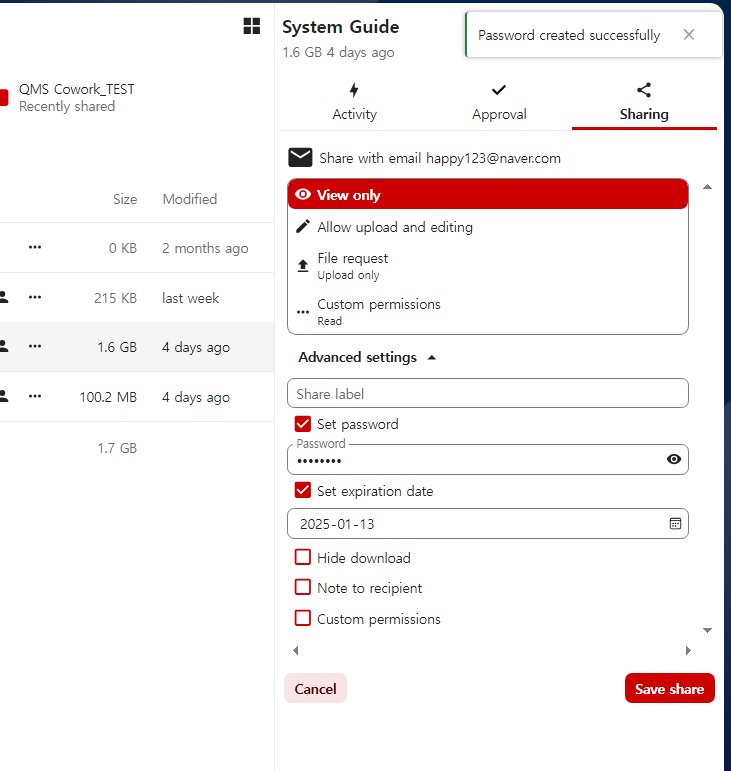
- Click the sharing icon to the right of the folder you want to share to open the Sharing menu tab.
- Enter the recipient's email address in the Search for share recipients field and press Enter.
- As shown in the image above, you can set Set Password (password protection) and Set Expiration Date (expiration date).
- After completing the settings, click [Save Share] to save the configured details.
How to Share with Read-Only Permission (Download X, Edit X)
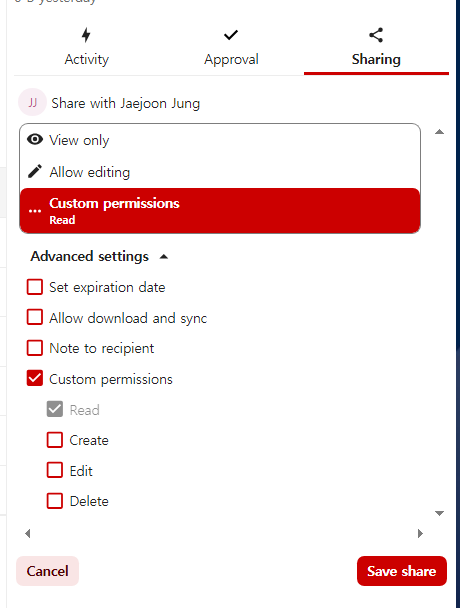
- Click the sharing icon to the right of the folder you want to share to open the Sharing menu tab.
- Enter the recipient's email address in the Search for share recipients field and press Enter.
- Click [Custom Permission], then uncheck the [Allow download and sync] checkbox (only enable the Read permission).
*Note: If you set the permission to View only, the download feature will still be enabled! - After completing the settings, click [Save Share] to save the configured details.
Overview of the User Interface
In a Documents Management System, you can share the files or documents you create, view files or documents shared with you, and download them based on your access permissions. To make better use of the file management system, please refer to the following information for effective operation.
- Main menu interface
- Files menu interface
- Search
- Personal Setting
Main menu interface(GNB)
The main menu is located at the top left corner.
Main menu detail icon information
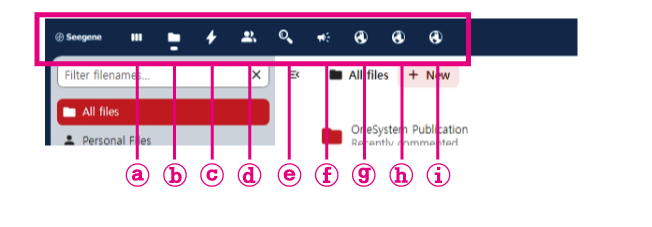
- ⓐ Dashboard: Displays a page showing recent activities.
- ⓑ Files: Displays a page where you can manage files you have uploaded or received.
- ⓒ Activity: Displays a page to view and check activity logs of yourself or within the same group.
- ⓓ Teams: Displays a page where you can create and manage teams and control access to files you create.
- ⓔ Search: A feature for searching files and documents.
- ⓕ Announcement: Displays a page where you can view announcements and notifications.
- ⓖ Learning: Direct access to the Learning Management System (LMS).
- ⓗ Q&A: Direct access to the Q&A System.
- ⓘ Homepage: Direct access to the Homepage.
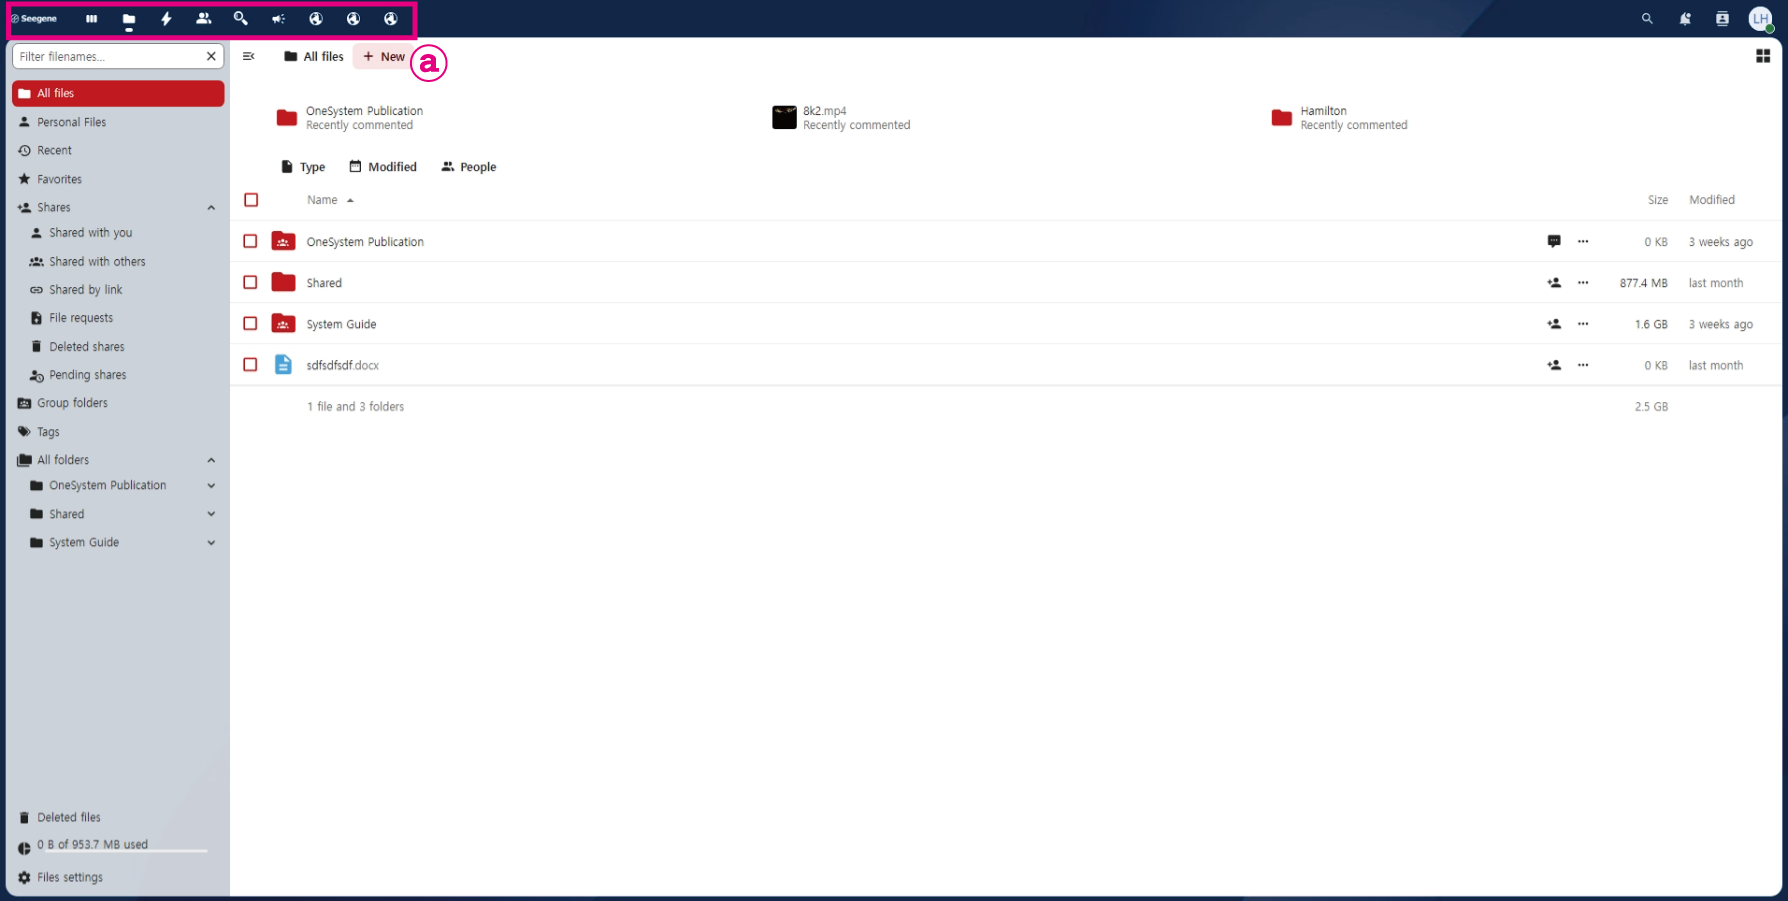
Files menu interface(LNB)
This is the menu list displayed by clicking [File] in the main menu.
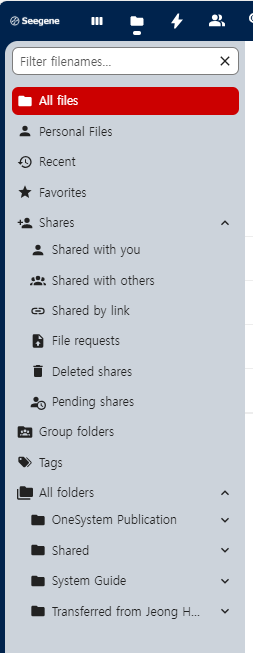
- All files: Folders and files, including public and personal ones, with read or higher permissions can be viewed on this page.
- Personal files: This page displays files and folders uploaded directly to your personal storage, as well as those personally shared with you.
- Recent: This page displays files or folders that you have recently accessed.
- Favorites: Files or folders marked with a yellow star next to them.
- Shares
- Shared with you: A page where you can view documents or folders that have been shared with you
- Shared with others: A page where you can view the documents or folders that you have shared with others.
- Shared by link: A page where you can view all files or folders shared via public links.
- File requests: A page where you can request files to be uploaded by internal or external users, and where the requested folder is displayed. (Currently, this feature is not operational.)
- Deleted shares: A page for managing shared files or folders that have been deleted.
- Pending shares: This is a page for managing pending shared items, where you can accept or reject files when they are shared with you. To enable this feature, go to [Personal] > [Sharing] > and disable the checkbox for "Accept shares from other accounts and groups by default."
- Group folders: A page where you can view and access folders associated with your group.
- Tags: A page where you can browse and access files based on tags.
*For the other submenus under the Activity menu, please check each menu based on the displayed history criteria.
Search
How to Search for Filenames
- Method 1: Click the [Files] or [Search] icon in the main menu and use the text box at the top left (hidden text: Filter filenames...) to search for files.
- Method 2: Click the magnifying glass icon at the top right to search for files.
*This feature supports integrated search, allowing you to search by [Tags], [Dates], [Teams], [People], [Contacts], and more.

Personal Setting
Personal settings can be accessed by clicking the personal image icon in the top-right corner [Personal Settings]. Here, you can configure basic personal information as well as settings for notifications and sharing preferences.

- If you want to configure whether to accept all shared documents, go to [Sharing] and disable the checkbox for 'Accept shares from other accounts and groups by default.'
*When this checkbox is disabled, shared documents will not be directly stored in [Shared] but will instead accumulate in [Pending Shares]. - If you are an admin, please make sure to review the notification settings for Files and Sharing under [Notifications].
File Structure and Access Permission System
The file structure and access permission system are initially configured based on the affiliation and permission details provided in the Account List.
File Structure
Each affiliated NewCo is provided with its own environment, and by default, the folders are structured as follows: OneSystem Publication, System Guide, and Seegene-[NewCo name]. Please review the descriptions below to understand the purpose of each folder.
(When publishing the NewCo guide documents, the content of the OneSystem Publication folder will be removed.)
- OneSystem Publication: A folder for providing R&D guide documents.
- Seegene-[NewCo name]: A folder where users can directly upload documents or files to share with Seegene and request verification.
File-Specific Access Permission System
The access level for each file may vary. If files appropriate to your permission level are not displayed, please contact the system administrator for assistance.
- OneSystem Publication: Only read
- Seegene-[NewCo name]: Only NewCo
How to Upload Files
- Navigate to the desired upload location (folder).
- Click the [+New] button next to the file navigation.
*If the button is not visible or is disabled, it means you do not have the necessary permissions for that folder. If uploading is essential, please contact the system administrator for assistance. - Click the [Upload files] or [Upload folders] button to complete the upload.
How to Share Files
Files can be shared in various ways depending on the purpose. Review the purposes below and proceed with the appropriate sharing method:
- Sharing with Internal Users: Share with individuals who belong to the same organization or account.
- Sharing with External Users: Share with individuals outside the organization.
- Enhancing File and Document Security
- Password Configuration
- Set Expiration Date for Access
- Custom Permission Settings
- File and Document Upload Requests
- Enhancing File and Document Security
Basic File Sharing Method
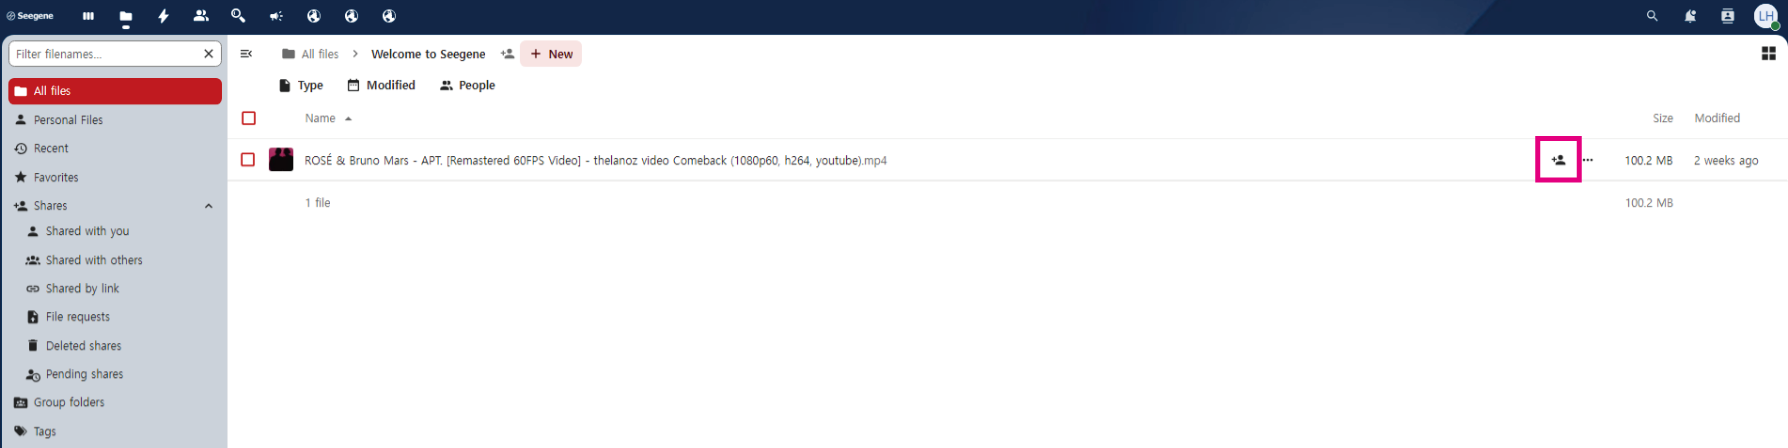
- Click the [Share Icon] button for the file you wish to share.
- A menu will appear on the right, displaying various sharing options.
Types and Definitions of Sharing Permissions
You can configure detailed permissions based on the sharing recipient. Additionally, you can grant extended access rights depending on the scope of sharing. Refer to the information below to share documents with the appropriate permissions.
- View only: Read-only permission.
- Allow upload and editing: Permission to upload files and edit documents (no delete permission).
- File request (folder-specific permission): Exclusive permission to upload files to a folder.
- Custom permission: Flexible permission settings, including read, create, upload, edit, and delete, based on the situation.
*The sharing range may vary depending on your account's permission level and the permission scope of the files or folders.
Sharing with Internal Users (Same Affiliation or Account)
Method 1: Sharing via Internal Link

You can share files or folders with internal users by copying and sharing the Internal Link. When shared this way, access permissions are automatically applied based on each user's assigned permission level for the file or folder.
*External users may find it difficult to access this URL.
Method 2: Sharing by Searching Names or Emails
Search for the name or email address of the user, select them from the dropdown, and share the file or folder. This method is also applicable for sharing with external users, allowing you to grant specific permissions to those without default access rights to the folder. It provides detailed access control settings for managing permissions.
Sharing with External Users
This method involves setting access permissions using Custom Permission.
This method involves setting access permissions using Custom Permission.
① Enter the external account (e.g., email address).
② Configure the custom permission settings.
③ Click [Save Share] to share.
When sharing this way, only the specific files or folders selected for sharing will be accessible. Additionally, functionality can be limited based on the defined access scope.
If you want to disable the download feature, you need to enable the [Hide Download] option.**
Enhancing File and Document Security During Sharing
Here are some features to secure file access during sharing
Password Configuration
You can set a password when sharing files or documents.
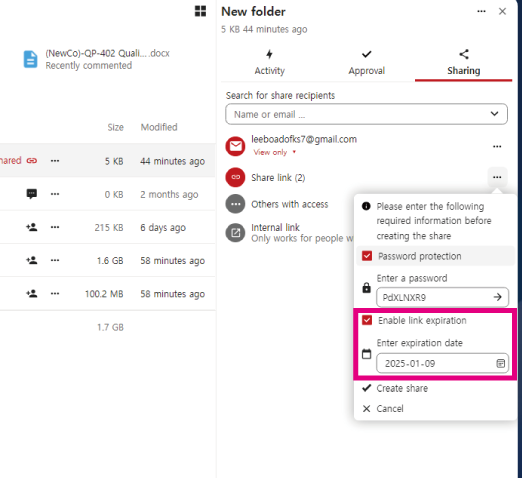
Sharing Without Specifying a Recipient by Creating a Link
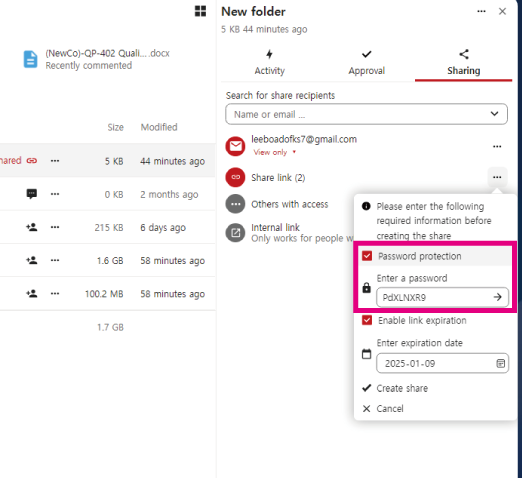
- Click the sharing icon to the right of the folder to open the Sharing menu tab.
- Click the [+] next to Share Link, then enable the [Password protection] checkbox.
- Fill in the [Enter a password] text field and click [Create Share].
- The link will automatically be copied, and you can share it by pasting it using Ctrl+V.
- Important Note:
If you forget the password, there will be no way to retrieve it. Be sure to make a note of the password before setting it.
Sharing a Link with Specific Recipients
- Click the sharing icon to the right of the folder to open the Sharing menu tab.
- In the Search for share recipients input field, enter the recipient's name or email address and press Enter.
- Click Custom permissions > Advanced settings > Enable the Set password checkbox > Confirm the password and proceed with sharing.
- Configure other detailed settings under Advanced settings, then click [Save Share].
Setting an Expiration Date for Access
When sharing with an expiration date, the shared link (URL) will expire after the specified period, displaying an error page.
Sharing Without Specifying a Recipient by Creating a Link
- Click the sharing icon to the right of the folder to open the Sharing menu tab.
- Click the [+] next to Share Link, then enable the [Enter expiration date] checkbox.
- Set the date in the expiration field and click [Create Share].
- The link will automatically be copied, and you can share it by pasting it using Ctrl+V.
Sharing a Link with Specific Recipients
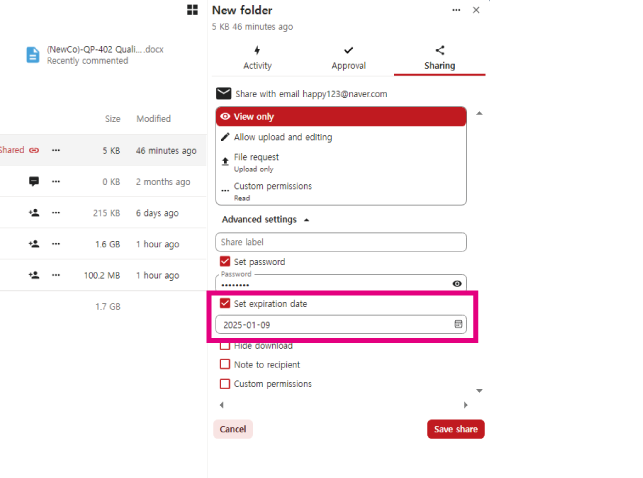
- Click the sharing icon to the right of the folder to open the Sharing menu tab.
- In the Search for share recipients input field, enter the recipient's name or email address and press Enter.
- Set the permission scope, then enable the Set expiration date checkbox.
- Configure the expiration date in the date field and click [Save Share].
File and Document Upload Requests
The File Request feature allows you to request uploads from external or internal users without exposing other documents during sharing. There are two methods for using this feature.
Requesting document uploads in a shared folder (for sending to multiple recipients at once)
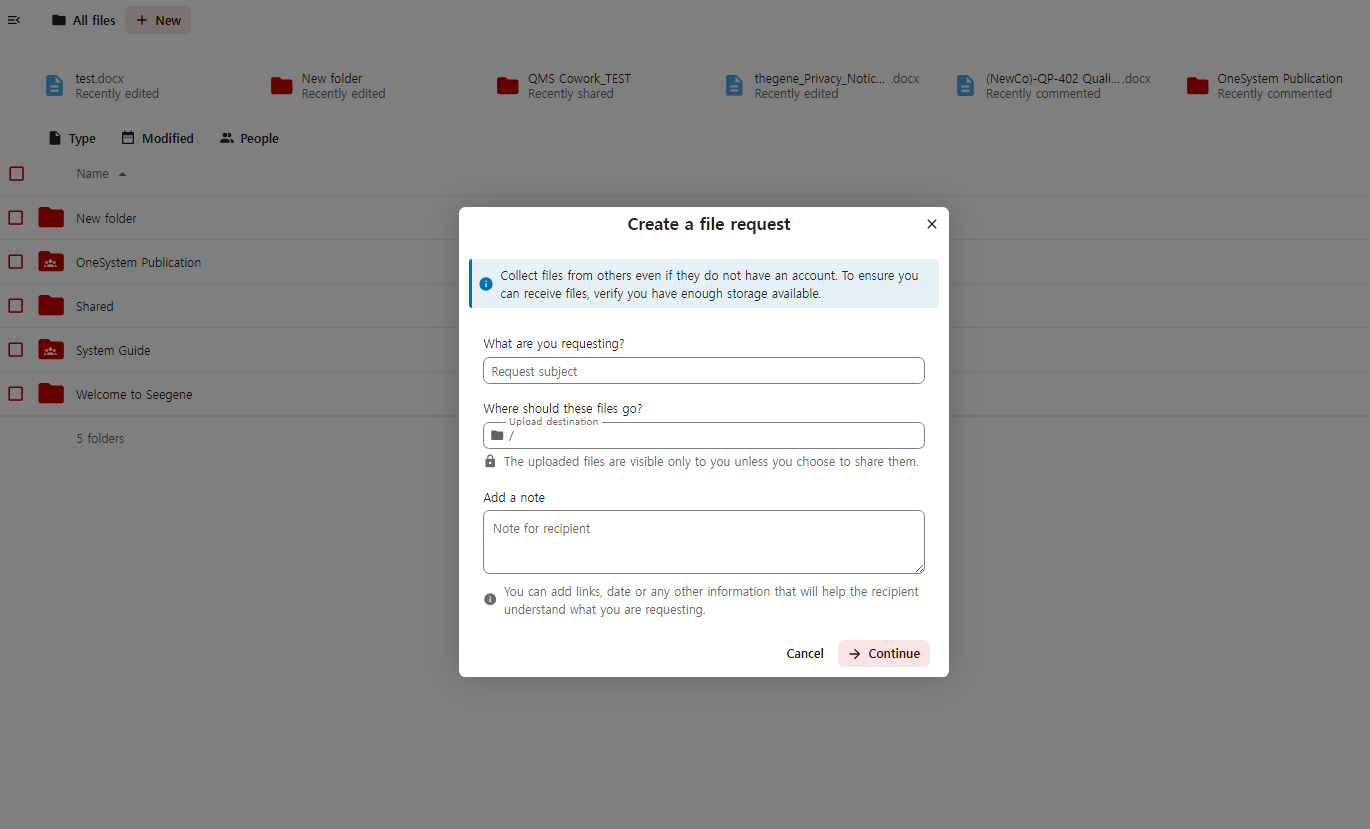
- Navigate to the folder where you want to request the upload, then click the [+New] button next to the menu navigation.
- Click [Create File Request] to open a pop-up window.
- Fill out the input fields (e.g., request subject, memo, expiration date, and password setting).
- At the bottom, enter the email addresses to send the request to, and click Close.
*When sending a request to multiple recipients, pressing "Enter" after entering an email address will allow the user to enter multiple addresses.
Requesting Document Uploads from the Folder List (For Sending to Specific Individuals via Email)
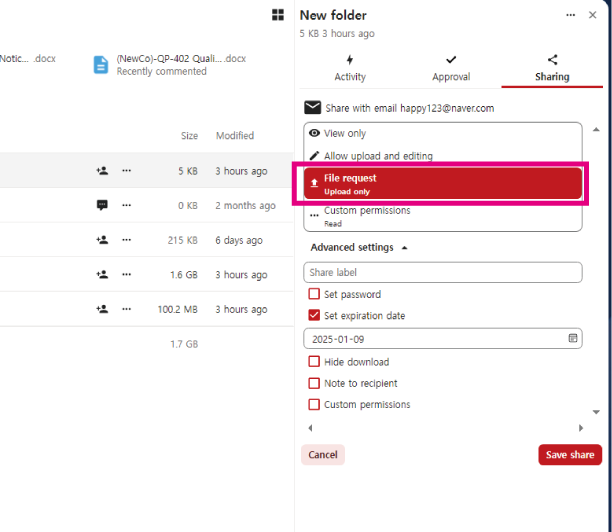
- Click the sharing icon to the right of the folder to open the Sharing menu tab.
- Select [File request] from the permission options.
- Review the detailed settings and click [Save Share] to send the email.